Monday 31 July 2017

Holly Wreath Tilda

Hello, lovely blogger friend's.
I hope you are well.
I'm sharing a Christmas card with you!
I thought this was my first Christmas card make of 2017, but it turn's out that I made one in March this year. So this is my second Christmas card that I have made for 2017.
I just love making them using festive Magnolia Tilda stamps.💗
Suha at Swedish House Crafts has a lovely selection of older Christmas Maggies. If you ever find yourself looking for any of them? There's a lovely selection HERE 

I used Holly Wreath Tilda from the Magnolia Aspen Holidays Collection 2016.
The image is stamped with Memento rich cocoa ink onto Bristol board cardstock, and cut out using a CartUs oval die.
I have coloured the image with Prismacolor and Polychromos pencils.


For the shape of my card I used KoKreate large frame frilly #5 and Maja Design "I Wish" 
Other dies used are Cheery Lynn English tea party doily and French pastry doily.
Sizzix on the edge snowflurries and Holiday greens. Marianne Design Ivy circle, Joy Crafts Ice crystal circle and Billes flourishes. Magnolia Doohickey lovely fence.
Doohickey Lovely Fence can be purchased HERE
The trees that I used are from Magnolia Doohickey Vol 12.

I searched high and low trying to find Doohickey Club Vol 14 as I missed the deadline for ordering the kit last year. Then by chance I mailed Suha at Swedish House Crafts to ask If she could get me the kit, and guess what? She already had one! I was so delighted to finally find the kit.
At present you can pre-order Doohickey Club Vol 16 (Fall In Love) HERE, and choose an additional item up to the value of £20. How generous is that?
You will also receive free postage when you spend £25 or over for any items that you order in store.


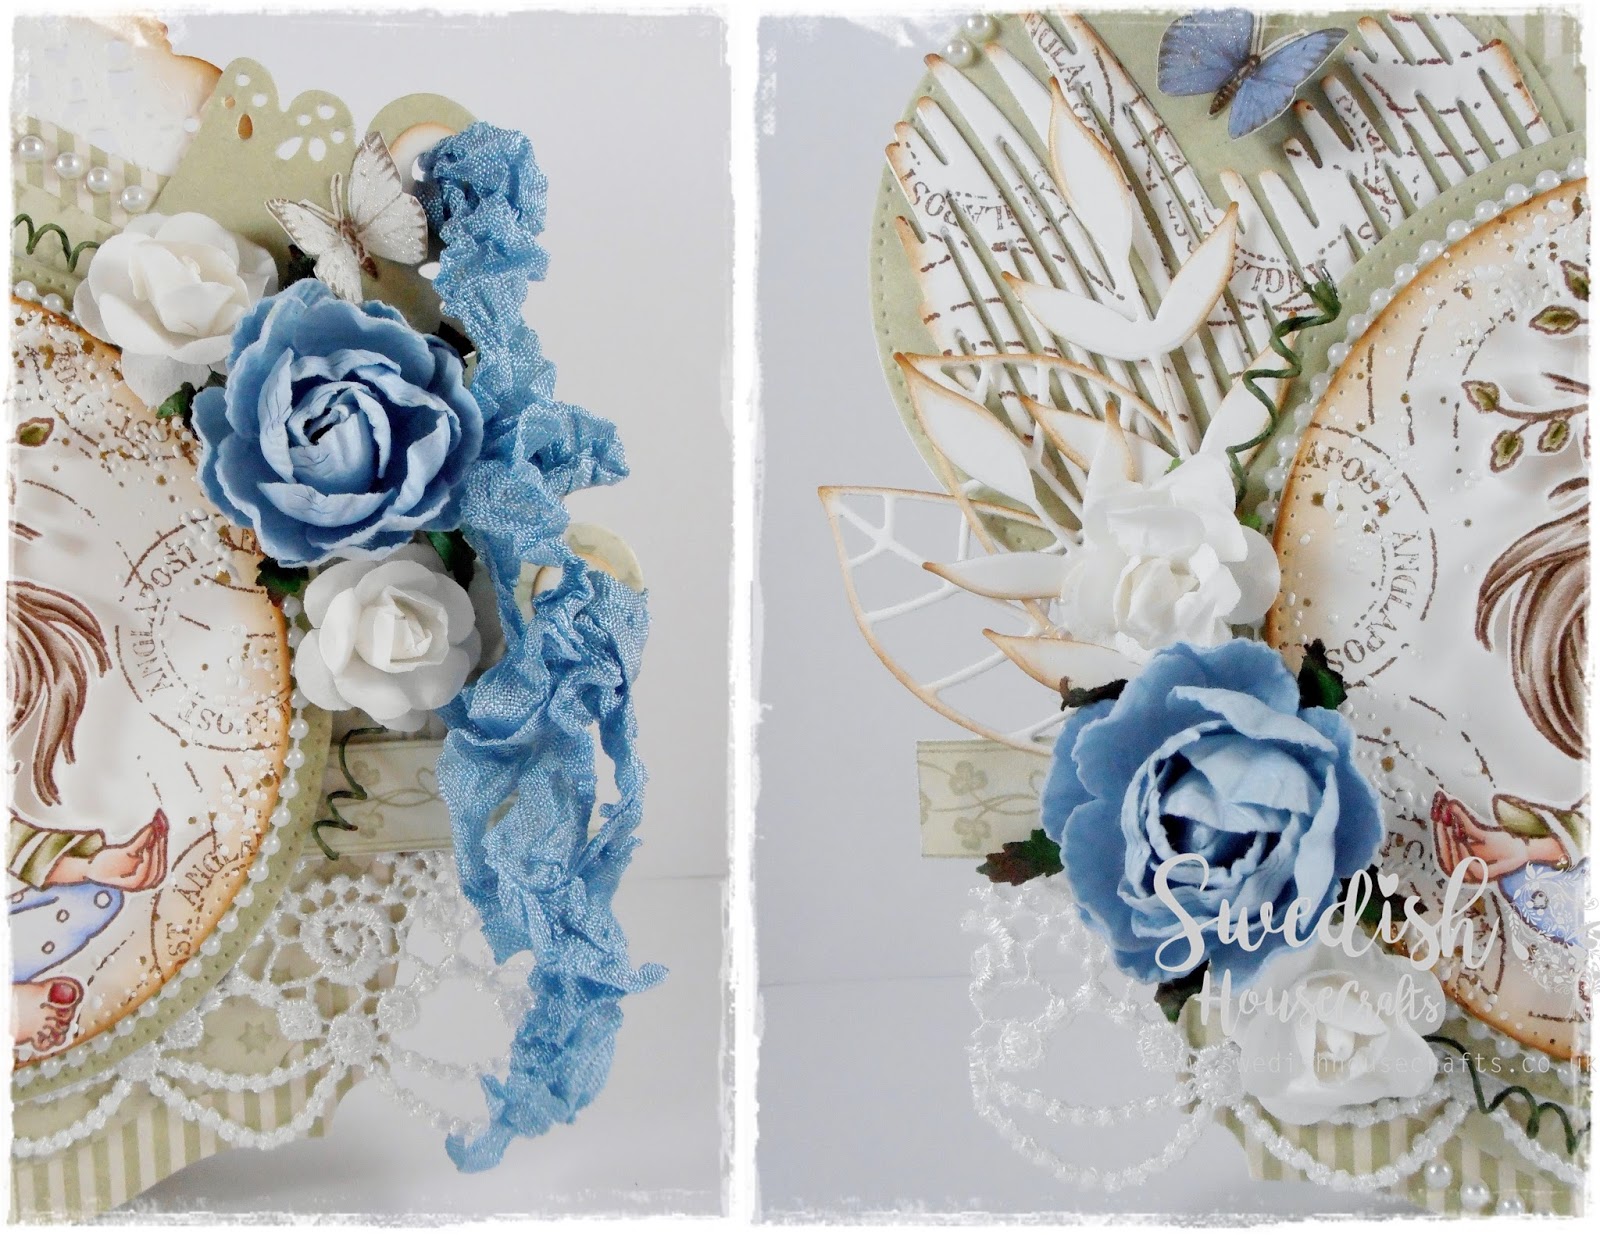
A closer look at the trees, lovely fence and flower arrangement.
I die cut the trees, stumps and stars using Maja Design papers, and built them up with 2mm foam tape.
I coated everything with Snow - Tex. 
I tied 2 jingle bells with red vax cord onto the lovely fence.


A close up of Holly Wreath Tilda.
I stamped around the outside of the image with an IndigoBlu stamp, and sprinkled a little shabby white embossing enamel around the edges inside.
I matted the image with 2mm foam tape onto a Joy Crafts oval die cut using Maja Design papers, and adhered a length of 2mm white pearl string around the outside.
I used glamour dust on the wreath's bow, and the heart on Tilda's bottoms.
Tilda's cheeks have been dotted wuth a white gelly roll pen.


Inside the card is decorated to compliment the front.


I am entering my card into the following super challenge's

Thank you for stopping by to visit today, and big thanks for all the lovely comments that you so kindly take the time to leave.

Crafty hugs


Saturday 29 July 2017

Swedish House Crafts.................Gummiapan Yoga Card


Hello, lovely blogger friend's.
I'm here today with my DT card for Swedish House Crafts
Suha, the store owner sent me some lovely products to play with. 
Links to the products are in text, and can be found at the end of my post.
Here is my card


I thoroughly enjoyed making this card using Gummiapan Yoga rubber stamp.
I have coloured her with Prismacolor & Polychromos pencils, and matched the greens with the gorgeous collection of Pion 'Theodore & Bella' papers.


Once I'd coloured the image I fussy cut around it.
I die cut the 3rd largest of a Roxstamps round pierced nesting die with white card and stamped around it with a Gummiapan Angelpost rubber stamp. 
Once I'd inked around the outside of the circle die cut I sprinkled a little shabby white embossing enamel around the inside.
I die cut the 2nd largest of a round pierced nesting die using Pion papers and matted the smaller stamped nesting die onto it with 2mm 3D foam tape.


The blue roses and seam binding are from my craft stash.
I die cut Gummiapan twig pointy leaves & Leaves and placed them between the flowers to the right.I die cut the Gummiapan sketched heart, and stamped over it with the Angelpost stamp.
I adhered the heart to a smaller round pierced nesting die using Pion paper.


Inside the card is decorated.

Thank you for stopping by.
If you click on the links at the end it will take you directly to the items I used in the shop.


Sunday 23 July 2017

Market Tilda & Fruit Stand

Hello. lovely blogger friend's.
I hope you are well.
Today I'm sharing a card that I have made using Market Tilda & Fruit Stand.
These gorgeous stamps were in my Magnolia Pop Up Box 3, and I lurve them all!
I've also used products from The Ribbon Girl online store.
This is my last post as DT member for The Ribbon Girl as I have decided to step down from the design team.

I used Magnolia Market Tilda & Fruit Stand from the Farm To Market 2017 Collection.
The image's are stamped with Memento rich cocoa ink onto Bristol board extra smooth cardstock.
I used a CartUs oval to die cut the Fruit Stand, and fussy cut around Farmer Tilda.
I have coloured the image's with Prismacolor & Polychromos pencils.


For the shape of my card I used GoKreate large frame frilly #5, and Maja Design
 "Coffee In The Arbour" papers.
Other dies used are; Cheery Lynn French pastry doily, and English tea party doily.
Magnolia Doohickey bloomy tags, bride bow, and market fence.
Marianne Design Ivy circle, La La Land build a bee, and Prima Forest leaves.
I inked the die cuts with Tim Holtz Vintage photo distress ink.
Here is a list of the products that I used on my card from The Ribbon Girl;


A close look at my flower arrangements, and gorgeous Farmer Tilda.
I dotted Tilda's cheeks with a white gelly roll pen, and used glamour dust on the heart of her dungarees. I also used glamour dust on the bee's wings.


A close look at both images.
I matted the fruit stand onto a Joy Crafts Noor! oval, and adhered a length of 3mm Ivory pearl string  around the outside.
Once I cut around Farmer Tilda, I adhered her with 2mm foam tape. Here she pops!
The paper butterflies that I have cut out are from a sheet of "Coffee In The Arbour" design paper.


Inside the card is decorated to compliment the front.

That's all from me today.
I hope you like what you see?

I'm entering my card into the following super challenge's


Thank you for stopping by to visit today, and big thanks for all the lovely comments that you so kindly take the time to leave.

Crafty hugs


Tuesday 18 July 2017

SHC 'Tuesday Craft Smorgasboard' Gummiapan Nature Dies With Pion Papers

Hello, lovely blogger friend's
I'm here with my "Tuesday Craft Smorgasboard" creation on Swedish House Crafts blog today.
 I have made a card using Pion papers, and Gummiapan nature dies.
Links to the products used are in the text, and can be found at the end of my post.


For the shape of my card I used GoKreate large frame frilly #2, and Pion "Theodore & Bella" complete collection design papers.
I die cut, and layered the design papers using Gummiapan stitched squares, and Gummiapan stitched banners, and matted them onto my card base.
(I so love these value for money metal dies. They cut perfectly through my EBosser, and are a delight to use.)
The Doohickey So Wrapped Lovely die is also from Swedish House Crafts. I used the design papers to die cut the tags, and embellished them with some of my craft stash.
I have embellished the doily with small petals die cut from Gummiapan flower, and adhered 3mm Ivory pearls to the centres.


The image is from Pion Design "Where The Roses Grow - Bouquets".
I used a Gummiapan stitched square to die cut the image. They are perfect for hand stitching as the guidelines are already there, and so I stitched around the outside of the image with a length of green embroidery thread. Easy Peasy!
The resin corner, and 3mm pink s/a pearls around the image are from my craft stash.


I hand made the flowers using Gummiapan flower dies. There are 5 dies in the pack.
I die cut the petals with green papers that are included in the Pion "Theodore & Bella" collection, and rubbed them with a ball stylus tool to add texture. Once I had assembled the petals, I placed 2 double ended stamens through the centres.
I die cut the foliage using Gummiapan twig pointy leaves, and leaves dies, and used the smallest flower petal from the Gummiapan flower die set, and adhered them along the centre of the twig pointy leaves.
The decorative pin is from my stash.


I handmade the pink flowers exactly the same way using pink papers from the collection.
The pocket watch image is one of many that are included on the 12 x 12 sheet of Pion "Where The Roses Grow" I cut around the image and added a 3mm Ivory s/a pearl to the centre.


Inside the card is decorated with the design papers, and a die cut Gummiapan stitched squares. There is a blank to write a message.

That's all from me today!
I hope that I have inspired you to have a go at making something using the gorgeous papers, and Gummiapan dies.

Below is a list of all the products that I used.

Thank you for visiting today!


Sunday 16 July 2017

Pion 'Paris flea Market' - July Anything Goes - Any Image Challenge At The Ribbon Girl

Hello, lovely blogger friend's.
I hope you are well?
Today see's a new challenge over on The Ribbon Girl challenge blog.
Our challenge for the next 2 weeks is.....................ANYTHING GOES - USE ANY IMAGE
There are 3 wonderful prizes up for grabs!
More details can be found at the end of my post.

I have made an 80th Birthday card, and used one of the gorgeous images from 
Pion 'Paris Flea Market'


For the shape of my card I used GoKreate large frame frilly #10, and Maja Design
'Coffee In The Arbour' papers.
Other dies used are; Cheery Lynn English tea party doily & French pastry doily.
Magnolia Doohickey bloomy tags, and Prima forest leaves.

Here is a list of the gorgeous products that I have used on my card from 
The Ribbon Girl online store.
Click onto the links below to take you directly to the products;


A close look at my floral arrangements.
The resin basket filled with roses is one that my special crafting friend sent me!
I cut out the paper butterflies using one of the sheets from Maja Design
'Coffee In The Arbour' papers, and gave them some sparkle using Wink of Stella clear glitter pen.


A close up of the beautiful image.
I die cut the image using a CartUs oval die, and stamped around the edge with an IndigoBlu stamp.
I matted the image onto a larger CartUs die cut oval using the design papers, and adhered the image onto it with 2mm foam tape.
I adhered a length of 3mm Ivory pearl bead string around the outside of the matted image, and added a few 3mm s/a Ivory pearl flatbacks.


Inside the card is decorated with Maja Design 'Coffee In The Arbour' papers, and a small GoKreate large frame frilly #10 die cut blank.

I hope you like my card?
Here are the 3 wonderful prizes up for grabs for 3 randomly drawn winners!

1st prize; £10 voucher for LOTV


2nd prize; The Ribbon Girl Carta Bell 'Flora' 6 x 6 paper pad


3rd prize; From Marianne Designs


My teamies have designed some gorgeous makes.
If you are looking for some inspiration then why not pop over HERE for a peek?

That's all from me!
Thank you for stopping by to visit today, and big thanks for all the lovely comments that you so kindly take the time to leave.

Crafty hugs